General Information
Benchmark Instructional Guide
Connecting Benchmarks/Horizontal Alignment
Terms from the K-12 Glossary
- Area
- Parallelogram
- Rectangle
- Rhombus
- Triangle
- Trapezoid
Vertical Alignment
Previous Benchmarks
Next Benchmarks
Purpose and Instructional Strategies
In grade 6, students solved problems involving the area of quadrilaterals and composite figures by decomposing them into triangles or rectangles. In grade 7, students apply formulas to find the areas of trapezoids, parallelograms and rhombi. In high school, students will extend this knowledge to solve mathematical and real-world problems involving the perimeter or area of any polygon using coordinate geometry and other tools.- Instruction includes using students’ prior knowledge of finding the area of a rectangle to build the area formulas for trapezoids, parallelograms and rhombi. The use of grid paper can support students in counting the squares to verify the areas are accurate.
- Investigations and explore activities for students can include:
- Draw or provide a cutout of a rhombus. Slice the rhombus vertically at a right angle. Slide the sliced off portion to form a square so students can see the base and height of the square are the same as that of the rhombus (MTR.5.1).

- Draw or provide a cutout of a parallelogram. Slice the parallelogram vertically at a right angle. Slide the sliced off portion to form a rectangle so students can see the base and height of the rectangle are the same as that of the parallelogram (MTR.5.1).

- Draw or provide a cutout of a trapezoid. Duplicate the trapezoid using patty paper or tracing paper and rotate it to form a larger parallelogram formed with both figures. The base of the parallelogram then becomes the sum of the two bases of the original trapezoid while the height is the perpendicular height of the original trapezoid. The area is one half of the area of this parallelogram since it contains two identical trapezoids (MTR.5.1).

- Draw or provide a cutout of a rhombus. Slice the rhombus vertically at a right angle. Slide the sliced off portion to form a square so students can see the base and height of the square are the same as that of the rhombus (MTR.5.1).
- Instruction includes the comparison of formulas between rectangles, trapezoids, parallelograms and rhombi.
Common Misconceptions or Errors
- Students may incorrectly identify a side length as a height rather than using the perpendicular distance between the bases. To address this misconception, use cutouts or measuring tools to show that these distances are not the same; consider using physical objects that are not square or rectangular to make sense of finding the correct height.
- Students may not properly locate the height or base(s) when using figures in various orientations. To address this misconception, provide multiple orientations of objects and figures. Note that parallelograms are like rectangles, in that any side can be considered a base, so there are two possible heights.
Strategies to Support Tiered Instruction
- Teacher models measuring the length and height of a given shape to demonstrate the difference between the dimensions.
- Instruction includes the use of manipulatives or geometric software to demonstrate the similarity of trapezoids, parallelograms and rhombi to square, rectangles, and triangles.
- Teacher co-creates a graphic organizer with images and formulas for trapezoids, parallelograms and rhombi and uses different colors to connect the dimensions of the figures to the variables within the formulas.
- Teacher uses cutouts or measuring tools to show that the length of the side of a figure is not necessarily the same as its height. Consider using physical objects that are not square or rectangular to make sense of finding the correct height.
Instructional Tasks
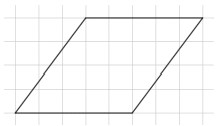
Instructional Task 1 (MTR.5.1)Trace a parallelogram or a rhombus on a sheet of graph paper. Highlight (or color) each of the sides a different color. Slice your two-dimensional figure vertically from a vertex at a right angle to an opposite side, to create a right triangle. Move the sliced-off portion to form a rectangle.

- Part A. What are the length and width of the created rectangle?
- Part B. Determine the formula for finding the area of your two-dimensional figure.
- Part C. Compare your two-dimensional figure and formula with a partner. What do you notice?
Instructional Task 2 (MTR.5.1)
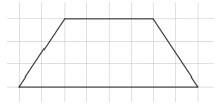
Duplicate the trapezoid given below using patty paper or tracing paper and color the corresponding bases the same color. Cut out both trapezoids. Rotate one trapezoid 180o and line it up next to the other.

- Part A. What figure has formed?
- Part B. What is the formula for figure’s area? Use this information to determine the formula for finding the area of a trapezoid.
Instructional Items
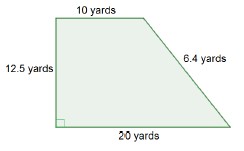
Instructional Item 1A new park is being built in the shape of a trapezoid, as shown in the diagram below. The builders will cover the ground with a solid rubber surface to ensure the children playing have a safe and soft place to land when they jump or fall. How many square yards of rubber will be needed for this park?

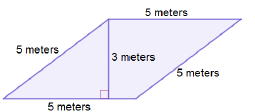
Find the area of the figure below.

*The strategies, tasks and items included in the B1G-M are examples and should not be considered comprehensive.
